
How to Estimate Foundation Sizes Early in Your Project

Choosing the right foundation type is one of the most important steps in residential construction but once you've selected the system that suits your project, the next big question is:
How big does your foundation need to be?
Whether you're working with a stiffened raft slab, isolated pad footings, or screw piles, getting a rough idea of sizing early can help with budgeting, planning, and design coordination even before the final engineering drawings are complete.
This article explains how you can estimate foundation sizes in the early stages of your project and where to go from there.
First: Select the Right Foundation Type
Before you start sizing anything, you need to choose the right foundation system for your site and building type.
Factors like soil conditions, slope, building loads, and construction budget will determine what system is most appropriate.
👉 If you haven’t yet selected your foundation, we recommend starting with this article:
How to Choose the Right Foundation System for Your Residential Project
It compares the most common foundation types used in Australian residential construction—such as stump footings, raft slabs, waffle pods, screw piles, and bored piers—so you can make an informed decision with your engineer.
Once you’ve settled on the most suitable foundation system for your build, you can move onto estimating its size.
Why Estimate Foundation Size Early?
Early sizing gives you:
- Budget insight – Concrete volumes, reinforcement quantities, excavation depth
- Feasibility checks – Can the structure be supported on your soil? Are piles required?
- Design input – Helps architects and designers coordinate around slab edges, floor levels, or pile caps
- Tender readiness – Better cost estimates for preliminary quotes or builder pricing
Even if it’s not final, a well-informed rough estimate can streamline conversations with your engineer and builder.
This Guide: Estimating Pad Footings Using the Tributary Area Method
In this article, we focus specifically on pad footings, commonly used to support structural columns or point loads in residential builds, however this method can be applied similarly to other foundation types.
We’ll walk you through a step-by-step method using tributary areas to estimate footing sizes before detailed design begins. This approach is quick, practical, and widely used for early feasibility.
Whether you're a builder doing take-offs, a designer coordinating grids, or a homeowner trying to understand cost this method will help.
Step 1: Understand What a Pad Footing Does
A pad footing is a square or rectangular block of concrete placed under a column, post, or wall to spread the load safely onto the ground.
Its job is to:
- Prevent the soil underneath from being overloaded
- Spread the building load over a larger area
- Limit settlement or movement
To size it properly, we need to understand how much load it needs to carry and how strong the soil underneath is.

Step 2: Estimate the Tributary Area
The tributary area is the portion of the structure that “feeds” into the pad footing.
For evenly spaced pad footings, this is typically:
Half the distance to the next footing in each direction
Example:
You have a column grid with 6m spacing in both directions.
Each footing supports a tributary area of:
6 m × 6 m = 36 m²
This means the footing is responsible for supporting the loads from 9 m² of the building above.

Step 3: Estimate the Load from the Structure
To size a pad footing, you need to estimate how much vertical load it will carry. This is done by multiplying the tributary area by the load intensity of the structure above.
Load intensity is made up of two components:
- Dead Load: Permanent structural elements — slabs, walls, roof, finishes, cladding
- Live Load: Variable or transient items — people, furniture, stored goods, vehicles
In early design, we estimate the total pressure from both using simplified “load intensity” values (in kPa), which represent how much weight is applied per square metre of area (kN/m²).
So if a pad footing supports a 36 m² area at 10 kPa, the total vertical load is 360 kN.
Typical Load Intensities by Building Type
Use the table below as a guide to estimate load intensity for different structural systems. These values combine both dead and live loads for early-stage calculation.
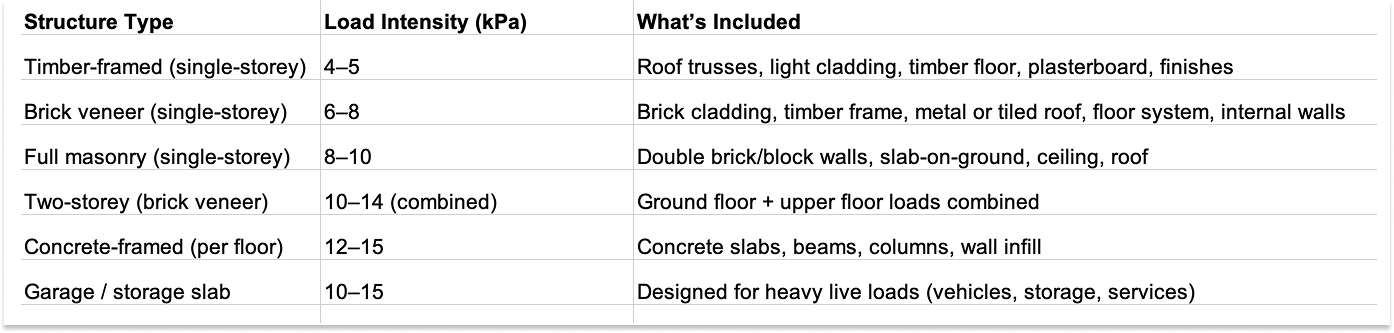
📌 Note: For multi-storey structures, estimate load per storey and add them at the ground level where they accumulate.
Worked Example: Two-Storey Concrete-Framed Building
Let’s estimate the load on a pad footing under a column in a two-storey commercial or residential structure with concrete slabs.
Column Grid:
Columns are spaced at 6 m × 6 m.
Tributary Area = 6 × 6 = 36 m²
Load Assumptions:
For a reinforced concrete building, a conservative estimate is:
- 10–12 kPa per floor for dead + live loads (from slabs, infill walls, finishes, occupancy)
- We’ll use 10 kPa per floor for this estimate
Load Per Floor:
36 m² × 10 kPa = 360 kN per floor
Total Load (Two Floors):
360 kN (upper) + 360 kN (lower) = 720 kN total
This is the vertical load the pad footing must support.
Tips for Load Estimation
- If your building has a roof slab supported by the same column, add its load too (~2–3 kPa extra).
- For residential upper levels with lightweight construction, the second floor may only add ~5–6 kPa.
- If estimating for a garage, storage, or service area, always use the upper range (up to 15 kPa).
- If unsure, round up your engineer will refine it later with exact materials and loading codes (AS1170.1).
Step 4: Estimate Soil Bearing Capacity
Now check how much pressure your soil can safely support. This is called the allowable bearing pressure, and it’s usually given in kPa.
The footing must be large enough to spread the 720 kN load without exceeding the ground’s capacity.
If you don’t yet have a geotechnical report, use the following conservative assumptions:

Step 5: Calculate the Minimum Required Footing Area
Now divide your total load by the allowable bearing pressure:

You can then calculate the minimum size:
For a pad footing, choose a square or rectangular shape that meets or exceeds this area.
Example:
Load: 90 kN
Soil: 150 kPa
Area = 90 ÷ 150 = 0.6 m²
A 750 mm × 800 mm pad footing (0.75 × 0.8 = 0.6 m²) would be suitable.
Step 6: Use Our Free Calculators for a Quick Check
We’ve built two calculators to help you apply these steps instantly:
🔹 Bearing Pressure Calculator
Input your structure’s weight and footing area to estimate imposed pressure on the soil.
🔹 Spreader Pad Calculator
Input the load on your pad footing and soil capacity to find the minimum footing size required.
👉 Try the Foundation Calculators here
They’re ideal for:
- Builders pricing preliminary jobs
- Designers checking site feasibility
- Homeowners planning early costs
Step 7: Collaborate with Your Structural Engineer
After estimating your pad footing sizes using the tributary area method, it's essential to consult with a structural engineer to refine these preliminary calculations. Your engineer will consider various factors, including:
- Detailed load combinations as per AS/NZS 1170
- Soil classification and behavior in accordance with AS 2870
- Minimum reinforcement requirements and footing depths
- Potential lateral loads, wind uplift, or seismic considerations
Engaging with your engineer early ensures that your foundation design is both safe and cost-effective, tailored to your specific site conditions and structural requirements.

